Washing Machine Cleaner: How to Keep Your Washer Fresh and Functional
We get it – laundry is a never-ending chore (the average U.S. household does around 7–8 loads per week!). With so much washing, it’s easy to forget about cleaning the washing machine itself. But a dirty washer can sabotage all your good laundry efforts. Residue builds up, odors start to lurk, and even bacteria can breed in the damp darkness of your washer. Taking a little time to use a proper washing machine cleaner (whether a store-bought washer tub cleaner or a DIY solution) can make a world of difference. Let’s talk about why a clean washer is so important for fresh clothes and peace of mind.
- Removes Residue & Grime: Detergents (especially if we use too much) and fabric softeners leave behind residue that sticks to the washer drum and parts. In fact, 71% of people have noticed white soap residue on laundry from adding too much detergent. That gummy buildup inside your washer traps dirt and can even make your clean clothes come out less clean. A good wash machine cleaner dissolves this gunk.
- Eliminates Odors: Ever notice a musty or sour smell when you open your washer door? That’s a clear sign of mildew and bacterial growth. (You’re not alone – 45% of people admit they’ve forgotten a wet load in the machine and ended up with that “funky” smell.) Mold and soap scum in the drum or rubber seal can make the whole machine (and your laundry) stink. Regular cleaning banishes these odors.
- Kills Bacteria & Mold: A warm, damp washer is basically a playground for germs. One university study found over 60% of home washing machines contained fecal bacteria, and 20% harbored staph bacteria. Yuck! Running a cleaning cycle with the right cleaner (or a sanitizing agent like bleach) helps disinfect the washer and keep nasty microbes in check. This is especially important for front-load washers, where the airtight door seal can trap moisture and foster mold.
- Improves Performance: A clean machine just works better. Removing scale and residue can help your washer fill and drain properly and even improve energy efficiency. You might notice your washer runs quieter and doesn’t have to work as hard when it’s free of buildup. Considering we spend about 4.5 hours a week on laundry (making it one of the most time-consuming chores), a well-maintained washer saves you time by getting clothes truly clean the first time. No more re-washing clothes because they still smell funky – a clean washer prevents that cycle of frustration.
- Protects Your Investment: Washers aren’t cheap! We invest in our appliances and expect them to last. Buildup of soap scum and hard-water minerals can actually shorten the life of your washer (corroding parts or clogging hoses). Keeping the washer’s tub and internal components clean will help it last longer and run properly for years to come. Think of washer cleaning as a little preventative maintenance that saves money on repairs in the long run.
Bottom line: using a washing machine cleaner regularly is key to a healthy, happy laundry routine. Cleaner washer, cleaner clothes, happier you!
DIY vs. Store-Bought Washing Machine Cleaners: Which Should We Use?
When it comes to cleaning out your washer, you have two main options: do-it-yourself cleaners or commercial (store-bought) cleaners. Both can get the job done, but each has its pros and cons. Let’s break it down so we can decide what’s best for our needs:
- DIY Cleaners: These include everyday household ingredients like white vinegar, baking soda, bleach, or even hydrogen peroxide. The big advantage is they’re inexpensive and readily available in your pantry. For example, plain white vinegar is a popular natural washer cleaner – it helps dissolve mineral deposits and deodorize (we Chicagoans love our vinegar tricks in laundry, as you can see in our guide on using vinegar in laundry!). DIY methods are eco-friendly and avoid harsh chemicals. However, they may require a bit more elbow grease (e.g. scrubbing certain parts) and careful use: vinegar isn’t a heavy-duty sanitizer (it won’t kill all germs), and bleach, while great at sanitizing, is harsh and must be used with caution. If you go DIY, never mix bleach and vinegar together – that combo creates toxic gas. Use one or the other in a given cleaning cycle.
- Store-Bought Cleaners: These are specialty products made specifically for cleaning washing machines. They often come in easy forms like tablets, packets of powder, or bottles of liquid formula. The appeal here is convenience and targeted performance. For instance, affresh® tablets are a well-known washing machine cleaner product that you simply toss into the drum and run a cycle – no measuring or mess. In a recent review of the best washing machine cleaners, editors chose Affresh tablets as the top overall pick because they’re easy to use and effective on all washer types. Store-bought cleaners are formulated to break down odor-causing residue, kill mildew, and rinse away without scrubbing. Many are also septic-safe and designed not to harm your machine’s components. The downsides? They cost a bit more per use than DIY solutions (each tablet or packet has a price), and some contain chemicals or fragrances you might not want. That said, many reputable brands have earned safety certifications (for example, Affresh’s formula is EPA Safer Choice certified, meaning it’s safer for people and the planet). If you’re short on time or just want an all-in-one solution, store-bought cleaners are a real time-saver.
Our Two Cents: There’s nothing wrong with using vinegar or baking soda to freshen up your washer – we often do a DIY clean in a pinch. But for deep cleaning heavy residue and odor, a commercial washer cleaner used periodically can be a smart addition. You can even alternate: maybe do a vinegar cycle one month and a tablet the next. The goal is simply to keep that drum clean and smelling fresh using whatever method you’re most comfortable with.
Best Washing Machine Cleaner Types: Tablets, Powders, and Liquids
Washing machine cleaners come in a few different forms. You might be wondering which type is best – tablets, powders, or liquids? Let’s look at each, because the “best” option can depend on your preferences. (The good news is that across various reviews, there are top-performing cleaners in each category!)
Tablet Cleaners
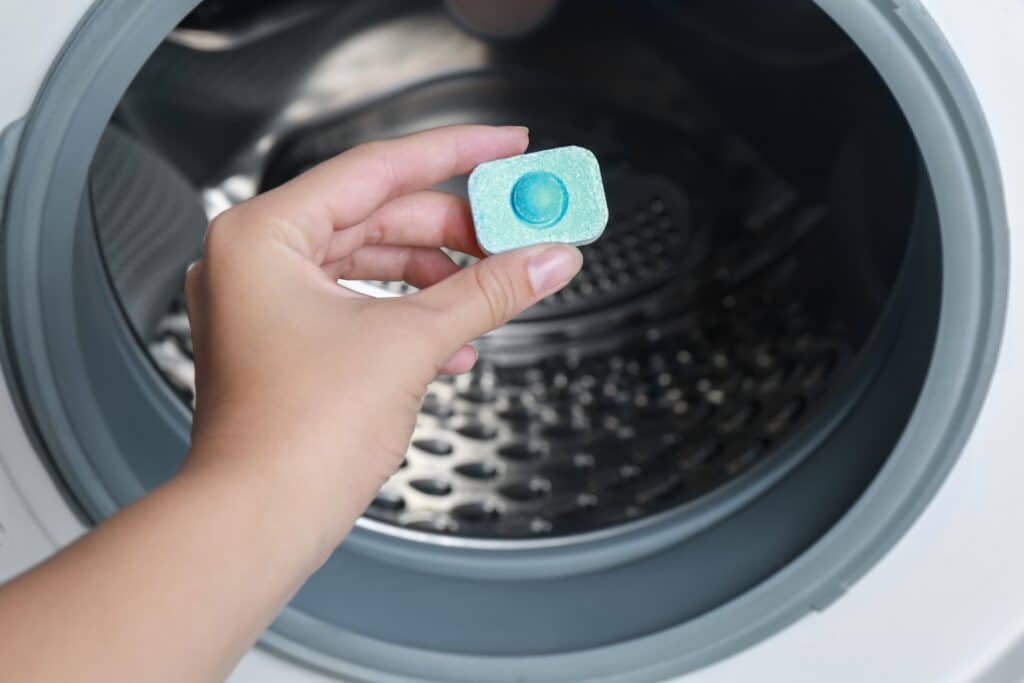
Tablets are super convenient. These are solid puck-like blocks that you simply throw into the washer (usually into the drum, not the dispenser) and run a cycle. They dissolve slowly throughout the hot wash, releasing cleaning agents that scrub away grime and odors. Tablets are popular for their ease: no measuring, no spilling. One well-known example is Affresh Washing Machine Cleaner tablets, which we mentioned above. They’re popular for good reason – they’re effective at removing odor-causing residue and are safe for all washer types (top-load, front-load, HE machines). We love that you can just run your washer with a tablet and walk away; one tablet is typically enough to vanquish stinks and soap scum in one go. Another tablet cleaner, Molly’s Suds, even comes in an extra-large size with a nice lemon scent; those tablets are designed so that you only need to use one per month or every 30 loads, which conveniently aligns with most maintenance schedules. Tablets often contain a mix of gentle surfactants, detergents, and sometimes oxygen bleach or enzymes to break down residue. If you’re the “set it and forget it” type, tablets might be the best washing machine cleaner option for you. Just remember to follow the package instructions – usually it’s as simple as running a normal or hot cycle with the tablet inside an empty washer.
Powder Cleaners
Powders usually come in small packets or scoops of a granular cleaning agent. Don’t confuse these with regular laundry detergent – these powders are specifically formulated to cleanse the washer itself. You’ll typically pour the powder directly into the drum (or sometimes into the detergent dispenser, depending on the product directions) and run an empty hot cycle. A great example is the OxiClean Washing Machine Cleaner, which comes in pre-measured pouches for convenience. Our research showed that OxiClean’s formula is a fan favorite and was rated the best powder cleaner by editors who tried it. It’s designed to target the residue and buildup that detergents leave behind. Using a powder cleaner is a lot like using a tablet – the only real difference is you’re sprinkling in powder instead of dropping a tablet, but if you’re used to scooping laundry powder it feels familiar. Powders tend to dissolve quickly and can include ingredients like citric acid (to eat away mineral deposits), surfactants, and sometimes a bit of fragrance or deodorizer. One thing to note: some powder cleaners have a strong scent or can leave some residue if not fully rinsed. The simple fix is to wipe out the drum with a damp cloth after the cycle if you see any leftover grit, or run a rinse cycle. Overall, powder cleaners are effective and often a little cheaper per use than tablets. They’re a great choice if you don’t mind measuring and want a powerful cleanser for your washer tub.
Liquid Cleaners
Liquids for cleaning washing machines come in a couple of forms. First, there are specialty bottled cleaners (some appliance brands or cleaning brands sell liquid washing machine cleaners). These you would pour into the machine per instructions. Second, household liquids like bleach or vinegar are also used as washing machine tub cleaners in DIY fashion. Commercial liquid cleaners aren’t as common as the tablets or powders, but they do exist. For example, some people use a product like Oh Yuk Washing Machine Cleaner (a liquid formula) or even simple bottles of formulated washing machine cleaning solution. The advantage of liquids is that they can easily disperse through the nooks and crannies of your washer. A bleach-based cleaner (or just bleach itself) will sanitize and kill bacteria and mold effectively. Vinegar is another liquid option – it’s gentler and can dissolve scale and soap scum. In fact, cleaning with vinegar is a tried-and-true method; one highly rated cleaning vinegar product has 6% acidity (a bit stronger than kitchen vinegar) to pack extra punch against residue. If you use a liquid, you’ll typically pour a measured amount into the empty drum or into the detergent dispenser and run a hot cycle. One con: liquids can foam or suds up if not designed for washers (never use dish soap or anything that’s not meant for washing machines, for example). Also, be careful with bleach – only about 1/2 to 1 cup is needed, and NEVER mix it with other cleaners in the same cycle. Overall, liquid cleaners (including a simple chlorine bleach rinse or a hot vinegar wash) are effective for monthly maintenance or tackling serious odor problems. They’re cheap and readily available, but just require handling with care. If you prefer natural and fragrance-free, go with vinegar; if you need heavy-duty sanitizing, use a diluted bleach solution on occasion. Your washer will be both disinfected and deodorized.
How to Clean a Front-Load Washing Machine (Step-by-Step)
Front-load washers are amazing for efficiency and cleaning power, but they do require a bit of TLC to keep them fresh. Front-loaders are notorious for developing odors because of that airtight door seal and the way water can sit in the drum. Don’t worry – cleaning a front-load washer isn’t hard, and it doesn’t take much time. Here’s how we like to do it:
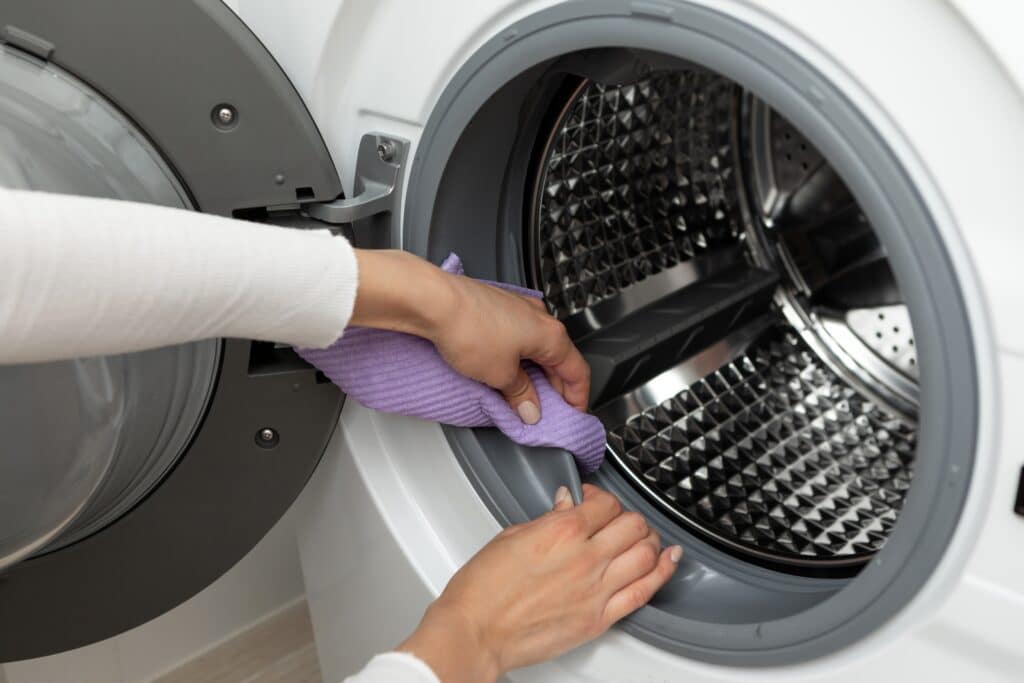
- Wipe out the door gasket. Start by opening the washer door and examining the rubber seal (gasket) that runs around the opening. You’ll often find this is where hair, lint, and detergent scum accumulate. Put on a pair of cleaning gloves and grab a damp cloth (you can spray it with a little vinegar or mild cleaner). Gently peel back the rubber gasket and wipe inside its folds. Remove any visible gunk, lint, or even socks (surprise!) that might be trapped. This step alone can greatly reduce that “smelly front loader” problem, because you’re clearing out the mildew breeding ground.
- Clean the dispensers. Most front-load machines have a pull-out drawer for detergent, bleach, and fabric softener. Over time, these compartments get grimy – detergent residue and fabric softener can gum up in there. Remove the dispenser drawer (consult your manual if you’re not sure how – usually it pulls out and may have a tab to push to fully remove it). Take it to the sink and give it a good wash with warm soapy water, or let it soak if there’s a lot of buildup. Use an old toothbrush to scrub inside the dispenser housing (the slot where the drawer slides in) to clear any mold or gunk. Rinse and put the drawer back. Clean dispensers ensure that cleaner (or even just your laundry detergent) flows in properly and doesn’t carry mildew.
- Run a cleaning cycle (empty) with a washer cleaner. Now for the main event: cleaning the washer tub itself. Make sure the washer is empty – no clothes! You have a few options for the cleaner here: you can use a washing machine cleaner tablet or powder (follow product instructions, typically one tablet or one packet goes directly in the drum), OR use a DIY method. DIY route: pour about 1 cup of distilled white vinegar into the detergent dispenser (or directly into the drum) and, for extra deodorizing, you can also toss 1/2 cup of baking soda into the drum. Alternatively, you could use 1/2 to 1 cup of liquid chlorine bleach (pour it into the bleach dispenser or directly into the drum). Do not use vinegar and bleach together! Pick one or the other. Once your chosen cleaner is added, close the door and select the hottest and longest wash cycle available. Many front-loaders actually have a special “tub clean” or “self clean” cycle – if yours does, use that (check out our washing machine cycles guide if you’re curious about these settings). Run the cycle. The hot water combined with the cleaner will break down grime and kill bacteria. Let the cycle finish completely.
- Wipe the drum and door dry. After the cleaning cycle completes, open the door. Take a fresh cloth and wipe down the inside of the drum, the back of the door, and again around the gasket. This will catch any loosened residue that the cycle might have missed draining out. Everything should smell much better now. It’s a good idea to also wipe the glass window on the door and the front of the gasket seal until everything is dry. Removing that moisture helps prevent any leftover mildew. If you used bleach, this wiping step also ensures you remove any lingering bleach water, since bleach can degrade rubber if left sitting on the gasket too long.
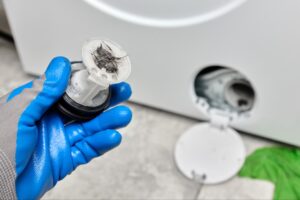
- Clean the drain pump filter (if accessible). This step is specific to many front-load machines: Most front-loaders have a small filter to catch lint and small objects, usually located behind a panel at the bottom front of the machine. Check your washer’s manual for the drain pump clean-out procedure. (Often, you open the little door, unscrew the filter cap, and have a towel or pan ready to catch water that comes out.) Cleaning this filter every so often is important, because a clogged pump filter can lead to odors or drainage issues. Remove any lint, coins, or debris from the filter, then screw it back in tightly. Not all washers make this easy to access, so if yours doesn’t have a visible filter door, you can skip this.
- Air it out. Finally, a habit: keep that door ajar! After cleaning – and after every wash, really – we like to leave the front-load door cracked open for a few hours (or all the time when not in use) to let air circulate. This helps dry out the drum and gasket, preventing mold growth. If you wiped everything dry in step 4, you’re off to a great start. Also, take a moment to wipe down the outside of the machine – front loaders often have water drip marks or detergent spills on the front, and a damp cloth will make it shine. Now your front-load washer is clean, fresh, and ready to tackle the next mountain of laundry.
How to Clean a Top-Load Washing Machine (Step-by-Step)
Top-loading washers (those with the lid on top) can get dirty and smelly too, though they tend to be a bit more forgiving than front-loaders. The good news is top-load machines are generally straightforward to clean because you don’t have a rubber door seal to deal with. Here’s how we clean a traditional top-loading washer:
- Wipe under the lid and agitator. Start with a little manual cleaning. Open the washer’s lid and look around the top rim of the drum and the underside of the lid. These areas can accumulate detergent splashes, lint, and grime. If your washer has a center agitator (the post in the middle), wipe around its base and fins as well. Use a cloth dampened with an all-purpose cleaner or vinegar to remove any visible icky spots. This preps the washer for its cleaning cycle by removing loose soil.
- Pour in your chosen cleaner and run a hot cycle. Just like with front-loaders, you have options: a commercial washer cleaner (powder or tablet) or a DIY solution. For tablets or powder, toss it directly into the empty drum. For a DIY method, you can use 1 cup of bleach or 1–2 cups of white vinegar. Do not combine bleach and vinegar. Close the lid. Now, select the hottest water setting and the longest cycle (many top-loaders let you stop the cycle after the tub fills to let it soak – if so, you can do a soak for 30 minutes to an hour, especially if using vinegar, to give it extra time to work). Start the cycle, let the washer fill with hot water and mix in the cleaner. If possible, pause the cycle once it’s agitating and let the solution sit and soak. After soaking, resume the cycle and let it run through. This hot wash will flush out bacteria, mineral deposits, and detergent residues from the washer tub.
- Clean the dispensers. While the cycle is running (or after it finishes), take care of any dispensers. Many top-loaders have a bleach dispenser and maybe a fabric softener dispenser (often a removable cup on the agitator). Remove any parts you can – for example, pull out the bleach dispenser insert or the softener cup – and rinse them with warm water. Scrub out any gunk with an old toothbrush. If they aren’t removable, use a turkey baster or squeeze bottle to flush them with hot water and white vinegar. Clean dispensers ensure that there’s no old detergent or softener stuck that could mold.
- Wipe the drum and surfaces. Once the cleaning cycle is done, open the lid. Using a clean cloth, wipe the inside of the drum, the agitator, and especially the top rim of the wash basket. On many top-loaders, when the water drains, some suds or loosened debris might get stuck above the water line. Wipe that off so the interior is sparkling. Also wipe down the lid and controls – splashes happen. Your goal is to leave no moisture or residue behind. Everything should smell fresh (if you used bleach, you might get that chlorine scent – leaving the lid open will help it dissipate).
- Final rinse (if needed). This is optional, but if you used a cleaner that left any scent or you just want to be extra thorough, you can run one more empty cycle on hot, no additives, to rinse out the washer. This is typically not necessary unless you used a very large amount of vinegar or a particularly sudsy cleaner. Most washer cleaners are designed to rinse away in one cycle. But the extra rinse can provide peace of mind that nothing remains to potentially irritate skin or affect your clothes.
- Leave the lid open to air dry. Just like with the front-loader, air is your friend. Keep the lid up after cleaning so the washer’s interior dries out completely. This helps prevent that damp environment that breeds bacteria. Going forward, it’s a good practice to leave the lid open after each laundry load for an hour or two. And that’s it – your top-load washer is now clean as a whistle!
After completing these steps, your washer (whether front or top load) should look and smell as good as new. There’s nothing quite like lifting the lid or opening the door and getting a whiff of… nothing. (Ahh, the scent of clean!)
How Often Should You Clean Your Washing Machine?
Now that we know how to do the deed, you might be wondering: how often do we really need to clean our washer? The general rule of thumb is about once a month. For most households, a monthly cleaning keeps odors and buildup at bay. In fact, some washer cleaner products are literally made for monthly use – for example, those Molly’s Suds cleaning tablets we mentioned recommend using one tablet every month or every 30 loads of laundry. This is a good cadence for remembering: if you do a load or two every day, you’ll hit ~30 loads in a month, which is a perfect time to freshen up the machine.
Of course, not everyone will need to clean that frequently. If you only do laundry once a week or so, you might stretch it to every 2–3 months. On the other hand, if you have a large family, pets, or you’re washing cloth diapers (anything that produces lots of grime or uses cool water), you might benefit from cleaning more often. Front-load washers often require more frequent cleanings (monthly is wise) because they’re more prone to odor. High-efficiency top-loaders should be cleaned at least every 3 months (and traditional top-loaders at least every 6 months) if you’re being conservative. Many washer manufacturers actually suggest doing a “tub clean” cycle twice a year at minimum, but that really is a bare minimum. We think doing it more often is worth it – it’s a quick task and prevents problems down the line.
Watch for the signs that your washer needs a cleaning now:
- Sniff test: The biggest red flag is smell. If you notice any musty, sour, or funky odors when you open the washer (or worse, if clean clothes are coming out smelling not-so-clean), it’s definitely time to clean your machine. Don’t ignore the “smelly washer” smell – by the time your laundry picks it up, you’re overdue for a cleaning.
- Visible gunk or mold: Peek inside the drum and around the door/lid. See any black spots, sticky residue, or soap scum buildup? That’s detergent residue and possibly mold. Likewise, check the detergent drawer and around the rubber gasket of a front-loader. Any gross sights = time to scrub and run a cleaning cycle.
- Sluggish performance: If your washer isn’t draining well, or you notice suds lingering after a cycle, buildup might be the culprit. Residue can trick sensors and slow things down. Before you call for a repair, try a cleaning – it might restore proper function. (Also, ensure you aren’t using too much detergent – remember, more soap can actually make things dirtier by leaving residue!)
- It’s been a while: Can’t remember the last time you cleaned it? Then it’s probably due. Mark your calendar or set a reminder for a monthly or bi-monthly washer TLC session. It’s far easier to maintain with regular quick cleanings than to combat a year’s worth of buildup. (One survey found the average washing machine gets cleaned only once a year – we can do better than that!)
In summary, aim for a monthly clean if you can, especially for high-efficiency and front-load machines. At the very least, do it every 3–6 months. Your nose will tell you if you need to do it more often. Regular cleaning prevents those nasty odors and ensures each load of laundry comes out fresh. Considering how much laundry we do (Americans run about 35 billion loads a year collectively!), a quick cleaning cycle is a tiny investment for a big payoff.
Keep it Clean: Final Tips and Next Steps
Congrats – you’re now a pro at washing machine cleaner know-how! A clean washer means cleaner clothes, less funky odor, and a happier laundry room. Here are a few final tips to keep in mind as you incorporate washer cleaning into your routine:
- Leave the door open: Make it a habit to leave your washer door or lid open for a while after each use. This simple step lets air circulate and dries out moisture. It’s one of the easiest ways to prevent mold and mildew from taking hold in the first place.
- Use the right amount of detergent: More is not better! Using too much soap causes excess suds and residue, which leads to buildup and odors. Follow the detergent label and measure – your washer (and clothes) will thank you. High-efficiency washers in particular need only a small amount of HE detergent to avoid gunking up the works.
- Hot water helps: Consider doing an occasional hot water wash (with no clothes) or the machine’s self-clean cycle if it has one. Hot water dissolves soap scum and kills bacteria more effectively than cold. Many people wash exclusively in cold for efficiency, which is fine for clothes, but remember to give the machine a hot cleansing wash periodically. Even running an empty hot cycle with a bit of vinegar can do wonders in between deeper cleanings.
- Don’t ignore persistent smells: If you’ve cleaned your washer and still notice smells, double-check you cleaned all the places where water might hide (like that drain pump filter on a front-loader). Also ensure there isn’t an issue with your drain hose or plumbing causing odors to back up. If all else fails, you might need to repeat a bleach cycle to thoroughly sanitize. And make sure to check out our advice on how to get smell out of clothes without harsh chemicals – sometimes your washer was clean, but your clothes needed a different approach to odor removal.
By now, we hope it’s clear that a little maintenance goes a long way. A fresh, clean washer makes doing laundry much more pleasant (dare we say, enjoyable?). After all, laundry might actually be America’s favorite chore – a national survey found that out of all household tasks, laundry was picked as the #1 favorite by 24% of people. Even if you don’t exactly love doing laundry, you’ll certainly love the difference a clean machine makes. We sure do – we’re kind of clean-obsessed around here!
One final note: if you ever feel overwhelmed by laundry or washer upkeep, know that you have neighbors ready to help. Here in Chicago, we pride ourselves on being friendly and time-saving when it comes to laundry. Whether you need advice or a place to do your washing, we’ve got your back. (At Spincycle, we take care to keep our machines spotless for you – our self-service laundry machines are cleaned and maintained regularly, so you can skip the washer cleaning and get right to washing your clothes!). We’re here to make laundry easier, cleaner, and maybe even a little fun.
Happy washing, and here’s to a fresh, clean machine!