Laundry Dryer Vent Cleaning: Why It Matters and How to Do It Right
Do you know the last time you cleaned your dryer vent? Between figuring out how to dry dark clothes without fading and debating gas vs. electric dryer options, it’s easy to overlook this unglamorous chore. But laundry dryer vent cleaning is a critical task that can save you money, prevent fires, and keep your laundry day running smoothly. In this article, we’ll explain why cleaning your dryer vent matters and show you how to clean your dryer vent the right way to boost safety and efficiency in your home.
Why cleaning your dryer vent matters

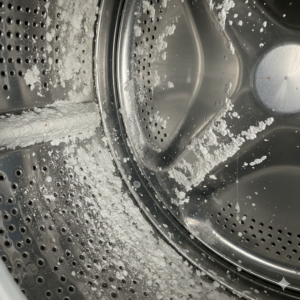
Every time you dry a load of laundry, bits of lint and fibers come off your clothes. While the lint trap catches some, a lot of lint sneaks into the dryer’s vent duct. Over time, that lint builds up like cholesterol in an artery, constricting airflow. The result? Your dryer works harder and runs hotter. This not only wastes energy and money, but also creates a serious fire hazard. The National Fire Protection Association reports that failure to clean dryer vents is a leading cause of thousands of home dryer fires each year. In fact, lint buildup is extremely flammable – it only takes a stray spark or excessive heat for accumulated lint to ignite.

Cleaning your dryer vent is also essential for appliance performance and longevity. A clogged vent makes it harder for moist air to escape, so clothes stay damp longer and the dryer’s heating system may overheat or shut off. If you’ve noticed your laundry dryer not heating as well as it used to, or the machine feels hot on the outside, a blocked vent could be the culprit. We’ve seen Chicago basements with vent ducts that run 20 feet or more – imagine how much lint can hide in there over time! Regular vent maintenance ensures your dryer can breathe, keeping dry times short and preventing unnecessary wear or breakdowns. In short, a clear vent means safer, faster, and more efficient drying (and one less thing to worry about on laundry day).
How often should you clean your dryer vent?
Most experts recommend cleaning your dryer’s vent at least once a year. For an average household, an annual deep clean of the vent duct keeps lint buildup under control. However, your ideal frequency can depend on usage. If you do laundry daily or have a large family – think multiple kids generating tons of towels and school clothes – lint will accumulate faster, and you may need to clean the vent every six months. Likewise, pet owners might schedule more frequent vent cleanings because pet hair and dander can clog the vent quickly. Essentially, the more laundry you do, the more often the vent likely needs attention.
Keep an eye on your dryer’s performance as a gauge. If you notice drying times creeping upward or other dryer not drying clothes issues after only a few months, don’t wait for the yearly mark – go ahead and clean the vent. It’s also wise to inspect the vent and exhaust hood periodically. Make sure the outdoor vent flap opens freely and isn’t blocked by lint or debris. Regular maintenance of this kind is a key part of laundry dryer maintenance that can save you from bigger problems down the road. Mark your calendar or set a reminder so dryer vent cleaning becomes an automatic part of your home upkeep routine, just like changing smoke detector batteries or furnace filters.
Signs your dryer vent needs cleaning
Dryer vents often give warning signs when they’re clogged up. Catching these early can prevent hazards and frustration. Here are a few common signs that it’s time to clean your dryer vent:
- Clothes take forever to dry: If a 40-minute cycle now runs for an hour or more (or your dryer is not drying clothes at all), a clogged vent is a likely cause. When lint blocks hot moist air from escaping, even small loads will stay damp and require multiple cycles.
- Overheating or burning smells: Does the dryer feel extremely hot to the touch on top or back? That’s a red flag. A blocked vent traps heat, making the dryer overheat. In some cases you might catch a hot, dusty or slightly burnt smell while running the dryer – that’s often scorched lint. Turn the dryer off immediately if you smell something burning.
- Visible lint or vent issues: Check behind the dryer and around the floor; excessive lint buildup there can mean internal vent blockage. Also, look at your exterior dryer vent hood while the dryer is running. If the flap isn’t opening or only a weak airflow comes out (or you see lint poking out), your vent duct may be choked with lint.
Other clues include a laundry area that feels more humid than usual when the dryer is on, or the dryer stopping mid-cycle due to overheating. Newer dryers sometimes even have an indicator light for restricted airflow. Don’t ignore these signs. They’re your dryer’s cry for help – and addressing them promptly will improve performance and prevent safety hazards. If you notice any of these issues during laundry dryer troubleshooting, schedule a vent cleaning as your next step.
Step-by-step: how to clean your dryer vent
Cleaning your dryer vent might sound intimidating, but with the right tools it’s a doable DIY task for most homeowners. Always put safety first: unplug the dryer (and turn off the gas supply, if it’s a gas dryer) before you begin. Here’s a simple step-by-step guide for a thorough vent cleaning:
Step 1: Pull out the dryer and disconnect it. Slide your dryer away from the wall carefully – just enough to access the vent duct. Most dryers connect to the vent via a short, flexible tube or pipe. Loosen the clamp or tape securing this vent hose on both the dryer side and the wall side, and detach it. Be gentle so you don’t tear the hose. This is also a good time to sweep out any lint or dust bunnies lurking behind the dryer.

Step 2: Clear the lint trap and inside the dryer. Remove the lint screen from inside the dryer and give it a thorough cleaning (run it under water and scrub with a little soap if it’s coated in residue). With the lint trap out, use the crevice attachment on your vacuum to suck out any lint from the lint trap housing. It’s surprising how much can accumulate below the screen. Also vacuum or gently brush around the dryer’s back opening where the vent hose attaches – lint loves to hide there.
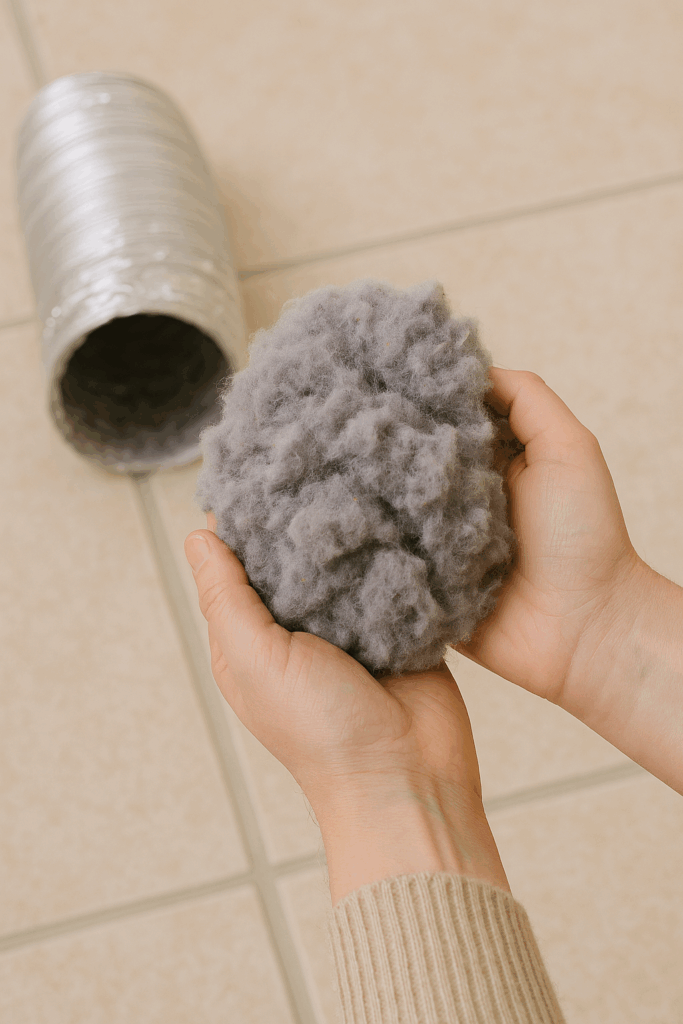
Step 3: Clean the vent duct thoroughly. Now for the main event: the vent duct itself. This is the tube that runs through your wall or floor to the outside. You can buy an inexpensive dryer vent cleaning brush kit (essentially a long, flexible brush that snakes into the duct). Insert the brush into the vent opening in the wall and push it through, twisting gently to snag lint on the brush. Every so often, pull the brush out and remove the clumps of lint it brings with it. You might be amazed (and a little horrified) at how much comes out! For especially long vents, it helps to also go outside to the exterior vent and insert the brush or a vacuum hose there to get lint from both ends. Take your time to ensure the duct is clear—this is the key to lint buildup dryer vent removal.
Step 4: Reconnect and test. Once the vent path is clean, reattach the dryer vent hose to the wall and the dryer. Make sure the connections are secure with the clamp or duct tape so it’s airtight. Push your dryer gently back into place, being careful not to crimp or crush the vent hose. Plug the dryer back in (and turn on the gas valve if applicable). To double-check your work, run the dryer on a quick air-fluff or no-heat cycle for a few minutes. Go outside and feel the exhaust: you should now feel a strong, warm airflow from the vent hood. Congratulations – you’ve successfully cleaned your dryer vent!
If at any point you’re not comfortable with these steps, there’s no shame in stopping and calling a professional. The goal is to have a safe, clear vent, whether you handle it yourself or get expert help.
DIY vs. professional dryer vent cleaning
Should you tackle dryer vent cleaning on your own or hire a pro? The answer depends on your comfort level and your home’s setup. DIY dryer vent cleaning can be a satisfying weekend task if you enjoy hands-on projects. It’s relatively inexpensive – a basic vent brush kit and maybe a shop vacuum are the main tools needed. For short vents that vent directly through an adjacent wall, DIY methods usually work well. As long as you can move your dryer and safely access the vent, many homeowners can do a decent job themselves by following guides like the one above.
On the other hand, professional dryer vent cleaning services exist for good reason. A technician will have specialized tools (like powerful rotary brushes and high-powered vacuums) to thoroughly scour long or hard-to-reach ducts. Professionals can be especially helpful if your dryer vent snakes through multiple bends or goes up through a ceiling to vent out the roof – scenarios where lint can be stubborn or access is tricky. They’ll also inspect the vent system for any damage, disconnected sections, or potential issues like nests or obstructions. Hiring a pro does come at a cost, but it brings peace of mind that your vent is 100% clear and your dryer is safe. It’s also fast – a pro cleaning might take an hour, whereas DIY could turn into an afternoon project.
In summary, if you’re handy and your vent is reasonably reachable, give DIY a shot to save some money. But if you’d rather not hassle with it, or you suspect a heavy lint blockage that you can’t easily reach, calling a professional is a smart move. Even the most clean-obsessed among us sometimes prefer to let an expert handle the dirty work! A short appointment could prevent a fire and get your dryer running like new. Many chimney sweep or HVAC companies, and dedicated dryer vent technicians, offer this service. Whether DIY or pro, what’s important is that the job gets done right.
Keeping your laundry routine safe and efficient
A little prevention goes a long way toward a safer, more efficient laundry routine. By making dryer vent cleaning a regular habit, you’re significantly reducing the risk of a dryer fire and improving your dryer’s performance. Your clothes will dry faster, your machine will use less energy (which means lower utility bills), and you’ll extend the lifespan of your dryer. These are simple dryer efficiency tips that anyone can adopt. Remember to also clean the lint trap before every load – it’s a quick step that supports vent health by catching more lint upfront. And avoid overloading your dryer; good airflow between clothes helps them dry without excessive strain on the appliance.
Finally, don’t forget that you have neighbors in the laundry business ready to help. Life gets busy – between work, family, and all of life’s curveballs, it’s okay to get a little assistance with the chores. That’s where professional laundry services come in. For example, wash & fold service or laundry pickup & delivery from a trusted local shop like Spincycle can lighten your load (literally). While we take care of cleaning and folding your clothes with neighbor-approved care, you can reclaim time to handle home maintenance tasks like vent cleaning – or simply relax! Our team is proud to be Chicago-owned and clean-obsessed, so you can bet we love helping customers keep laundry day stress-free.
In conclusion, a clean dryer vent is key to keeping your home safe and your laundry routine running like a well-oiled machine. Make it a priority on your home maintenance checklist. With the guidelines and tips in this article, you now know why it matters, how often to do it, and how to do it right. So go ahead and give your dryer a little TLC – whether you DIY or bring in a pro, you’ll breathe easier knowing your laundry room is safer and more efficient. Happy drying!